>>Go back to screaming skull labs<<
This guide will give you a brief walkthrough of the steps involved in constructing a robot from a hacked remote control tank using cheap and commonly available components. This Robot is an idea platform for the experimenter and in my opinion is comparable to commercially available robots aimed towards beginning hobbyists that very often run into the range of hundreds of dollars.
Really there are two ways of building this robot....
The first option would be to purchase the necessary pieces (such as motor controllers and infer-red object detection systems) Pre-Assembled or in kit form. There are a wide ranging assortment of online and catalog retailers who are able to provide anyone with an almost completely plug and play robot.
We will be examining the second option, For our robot we will be scratch building each sub assembly ( Motor controllers and Infer-red object detectors) with mostly found or very cheap parts and components.
The only special ability we have that may not be shared with other robotics hobbyist is out ability to etch our own PCBs, Although this does make assembling these systems nicer looking nothing found here is advanced enough that is couldn't be built on small project boards and point to point wired.
The Platform
Our platform for this robot is a common enough remote controlled toy tank, My robot actually started life as a radio shack "Battle Iron Claw' remote control toy as shown in Fig.1, But once I took the gripper off the front (and lost it long long ago) it was basically a remote control tank (see Fig 1.2).

Fig 1. This is an example of a Radio Shack Battle Iron Claw toy as was used in another project.

Fig 1.2. Pictured is My Battle Claw Robot with the cover, claw and old control circuitry removed.
The key feature we are looking for in our tank is dual motors driving the tracks, The easy way to tell if a possible candidate has dual motors is the ability to drive both the tracks at the same time in opposite directions. (See Fig 2).

Fig 2. Shown above is a Top-off shot of a typical remote control tank with all its brains removed.
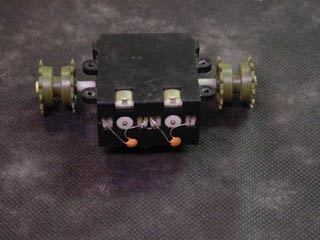
Fig 2.2 Detail shot of gear box, Notice the dual drive motors.
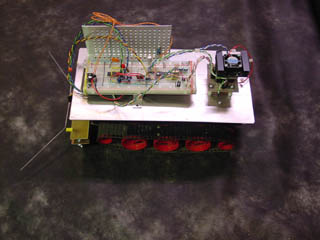
The next thing we'll want to think about once we've chosen our toy tank is finding somewhere to mount our electronics, For the electronics mounting platform on my robot I've used a rectangular piece of sheet aluminum. This an ideal material for the robotics hobbyist since it is very easy to work with; Cutting to shape can be accomplished using simple hand tools such as tin ships and any required holes can be drilled using a simple hand held drill.
Its worthwhile noting that sheet aluminum can be purchased very cheaply and you do not need to own metal working tools, Since it is a soft metal it can be drilled and cut using wood working tools if that's all you have access to. We have gone with sheet aluminum primarily because the sheet metal shop up the street provides us with nicely sized pieces of scrap sheet at nearly no cost.
If you wanted to get a little more fancy you can use a piece of plexi-glass or lexan in place of aluminum, However these materials are much more difficult to work with as they do not cut nearly as easily or cleanly and I personally would not recommend the for the beginner.
My battle claw robot has 3 conviently located plastic risers that were previously used for mounting the plastic body and making them now ideal for mounting a plate on (See Fig 3). One thing I later decided I had better glue some #4 threaded stand offs taken from old computer cards into these plastic risers so that I may remove the screws holding without striping-out or cracking the plastic. These small metal standoffs are also an excellent method or repairing any stripped out or cracked plastic risers that you might encounter if your not the first owner of your toy tank.

Fig 3. These plastic risers are perfect for supporting the platform for our electronics, Note the Small metal standoffs used as well.
Fig 3.2. the aluminum platform installed on the battle claw chassis, I've also installed a couple rubber grommets to allow me to pass wires up from the bottom.
Motor controllers
The microcontroller board of our robot will not be able power the motors directly, We will need to add a motor controller. Your motor controller can be made of either relays or special motor controller ICs as long as it will be able handle to the voltage and current that our motors will require.
Your motor controller will define your requirements as far as batteries go (6Volt motor controller needs 6Volt battery and so on) So we are going to look at motor controllers before batteries.
While we were looking around the shop for something to make a motor controller out of, we hit upon an old stripped VCR that yielded two BA##### motor driver ICs.
After examining the datasheets we decided they would work well for our application, best of all they were free and we already had them!. Each of these IC's is able to control a motor on and off in forward or reverse depending on two control signals. The full datasheet for these drivers is available here:
The datasheet includes a Application circuit that we used in our controllers, It was designed for a 12Volt system, we now knew how many volts our battery packs have to be.
We etched our own PCB for our controllers but you can build yours on a small Project board and could probley even stick to the same layout a we used. during the board layout we spaced our drivers so that they could be screwed onto a small section of aluminum U channel that would act as the heat-sync.
Soon after we started using these Drivers we realized they were creating much more heat than we had anticipated, The reason being that the motors in our tracked robot were designed to run on about 4.5 - 6 volt while our controllers ran on 12, this meant that 50% of the power was being drained off in heat dissipation. Another problem we found was that a Resistor in the circuit was also over heating, *Dan why was that happening again??*
I added another Small heat-sync and also added a tiny brushless fan from my parts bin on top of it to keep things extra cool. This addition brought the temperature back within acceptable levels (Doesn't burn your finger tip).